domenica 20 gennaio 2013

Nutella Cookies

As I mentioned this blog rises not to treat a single argument, but to talk about various different passions  and kitchen is one of these ,so I thought I'd share with you this recipe.
Who doesn't love Nutella? Despite all say that gets hurt is impossible to resist her!
These cookies with Nutella are very simple and quick to make, also suitable to those who feel a little clumsy in the kitchen and to those like me who didnt want to wash a thousand things after preparing something (you'll have to clean only a few things: the bowl for the dough and rolling pin!)
The tools that you will need for the recipe are:
-Libra
-rolling pin
-parchment paper
-cookie cutters for cookies in three different sizes (flowers, hearts or whatever you want)
-teaspoon (for cookies)
-mixer like Kitchen Aid of something similar (if you don't have it you can easily knead by hand even if you put a little bit more)

And here are the ingredients:


*First put the butter at room temperature at least 30 minutes before starting the recipe (especially if it's winter) to facilitate the working of the dough


-Mix all ingredients in a  Bowl or  Kitchen Aid (photo 1)

-The dough is a kind of pastry so it worked very little otherwise it will not be crisp. Just have the consistency that you see in the picture 2 is ready

-Roll out the parchment paper and flour (3) (if you have a beautiful marble kitchen floor to work you can live without it and roll out the dough. The thickness should be about 3 mm (photo 6)

-Each cookie consists of two flowers. One larger and one midsized placed over "to roll". The smallest of the three we need to create a hole in the Middle so that cookie  show the filling inside. (photos 4, 5 and 6)

-Put the biscotti on baking sheet covered with parchment paper a little distance between them so that they do not join in cooking (photo7)

-VENTILATED oven cook for 15 minutes at 180 degrees (the temperature varies depending on the oven so take a look after the first 10 minutes)

-Cold once it's time to fill the cookies. Of course you can use whatever you want as a topping: jam, cream etc ... but  Nutella is always  Nutella! XD

-Put a little Nutella on the biggest cookie-I have put half a teaspoon, then it's up to you to decide how much, but not too exaggerated because resting on top of the other cookie might exit from all sides (photos8, 9 and 10 )

-And here are the cookies ready with a sprinkling of powdered sugar! To preserve them better submit even close them in a tin box and they will last many days fresh as freshly baked.


I hope that you enjoy the recipe and if you like it, write a comment and let me know if you have tried to get them. See you soon!


Come ho già detto questo blog non nasce per trattare un unico argomento, ma per parlare di varie passioni diverse fra loro;a cucina è una di queste così ho pensato di condividere con voi questa ricetta .
Chi non ama la Nutella? Nonostante tutti dicano che faccia male è impossibile resisterle!
Questi biscotti con Nutella sono molto semplici e veloci da fare,  adatti anche a chi si sente un po' imbranata in cucina e a chi come me non ha voglia di lavare mille cose dopo aver preparato qualcosa  (dovrete pulire solo qualche posata , la ciotola per l'impasto e il mattarello, meglio di così!!).Nelle foto più in alto potete trovare tutti i passaggi numerati.
Gli strumenti che vi occorreranno per la ricetta sono:
-bilancia
- mattarello
-carta forno
-formine per i biscotti in tre dimensioni diverse (fiori,cuori o quello che volete)
-cucchiano (per farcire i biscotti )
- robot per impastare (se non lo avete potete impastare  tranquillamente a mano anche se ci si mette un po' di più).

Ed ecco gli ingredienti :


Per prima cosa mettere il burro a temperatura ambiente almeno mezz'ora prima di cominciare la ricetta (soprattutto se è inverno) per facilitare  la lavorazione dell'impasto


-Mischiare tutti gli ingredienti nella ciotola o nella macchina impastatrice (foto 1)

-L'impasto è una specie di pasta frolla perciò va lavorata molto poco altrimenti non sarà croccante. Appena avrà la consistenza che vedete nella foto 2 è pronta

-Stendere la carta forno ed infarinare (se avete un bel piano di marmo potete farne a meno, beate voi!) e stendete l'impasto (foto3). Lo spessore deve essere sui 3 mm ( foto 6)

-Ogni biscotto è composto da due fiori. Uno più grande ed uno di grandezza media posizionato sopra "a panino" . Il piu piccolo dei tre ci serve a creare un buco nel biscotto medio così da far vedere la farcitura all'interno. Foto 4,5 e 6.

-Mettere i boscotti sulla teglia  ricoperta di carta forno un po' distanti fra loro in modo che non si uniscano in cottura (foto7)

-Cuocere a forno VENTILATO per 15 minuti circa a 180 gradi ( la temperatura varia a seconda del forno perciò date un'occhiata dopo i primi 10 minuti)

-Una volta freddi è il momento di farcire i biscotti. Naturalemente potete usare quello che volete come farcitura : marmellata, crema etc... ma la Nutella è la Nutella! XD

- Mettere un po' di Nutella sul biscotto più grande - io ne ho messo mezzo cucchiaino, poi sta a voi decidere la quantità, ma non esagerate troppo  perchè poggiando sopra l'altro biscotto potrebbe uscire  da tutti i lati (foto 8,9 e 10)

- Ed ecco i biscotti pronti con una spolverata di zucchero a velo! Per conservarli meglio potet anche chiuderli in una scatola di latta e durareranno molti giorni freschi come appena fatti.

Spero che la ricetta vi piaccia e se vi va scrivete un commento e fatemi sapere se avete provato a farli anche a voi! 


domenica 6 gennaio 2013

My Skin Care routine


I’ve had a few suggestions to make a post on what skincare products I use on my face at the moment and so here it is!
Of course I'm always looking for the perfect skin care product, but the ones I'm using in this period work very well. Before moving to the products I would like to give some simple tips that I found truly effective and don't cost anything and although many consider them obvious are critical;
1. WATER!!  DRINK WATER ( 2 lt per day needed to the body for its correct operation and disposal of toxins that helps  the skin; 
2. don't crush the pimples with your fingers! In this way, you increase the chances of forming scars and spread bacteria in the area around the pimple by creating many others around (a real ripple effect).This does not mean of course that you will not have to open them and walking around with giant pizzas in your face, you simply need to use a better method!
3.How to open a pimple: first, wash your hands well with SOAP and water, made  a cotton wool soaked in hydrogen peroxide (not alcohol, the oxygenated water is the best disinfectant that exist); take a sterile needle or a sewing needle (in this case, pass it over a flame until the tip does not become (orange); so the needle is sterilized too; now it's time to open the odious pimple!Insert the needle in the little bubble of pus that has formed gently without going to the bottom but starting from one side, cross it completely and then pull up the needle; in this way you break the "skin" that encloses the pus without creating trauma to the skin and you can clean the pimple with cotton soaked in hydrogen peroxide by pressing lightly if necessary.
4.Hand off your face! clean often what comes into contact with our face (telephones, pillows etc) and don't touch your face if you don't need!! get your hands off your face, especially when you're away from home, does nothing but to proliferate bacteria on our skin!
5.Give a chance!  When you try a new skin care product you must be persevering in its use! You can't expect a miracle after a week! To see some results you should wait at least one month!
These are the tips I found personally effective, but of course you also  must use specific products for skin problems.

So these are the products of my daily skin care; I think they can be useful for everyone because for every  product the formulation have been created for different types of skin from dry to oily anymore and are effective to address various skin problems: deep cleanising, fight acne and blackheads, keep your skin moisturized.

- CLINIQUE liquid facial soap milk (from very dry to oily skin)

-CLINIQUE Mild Clarifying lotion ( gently exfoliator from dry to oily skin)

-Avène EAU THERMALE ( soothing thermal  wather for acne and persistent redness)


- BIONIKE  Defence Hydra ( deep hydratation from dry to oily skin)

-KANEBO Sensai Eye Contour Cream (eye contour hydratation)

-KANEBO Silky Purifying Cleanising Oil ( from dry to oily skin deep cleanising, makeup remover)

Hope you like this post and if you want to know something about a specific product just post a comment.


Ho avuto qualche richiesta di fare un post sui prodotti di  skin care che uso  al momento e quindi  eccoli!
Naturalmente sono sempre alla ricerca del prodotto per la cura della pelle perfetto, ma quelli che sto usando in questo periodo funzionano molto bene. Prima di passare ai prodotti vorrei dare alcuni semplici consigli che ho trovato veramente efficaci e non costano nulla e anche se molti li considerano ovvi sono fondamentali;
1. L'ACQUA!! BERE acqua (2 lt al giorno necessari per il corpo per il suo corretto funzionamento e lo smaltimento delle tossine che aiuta  la pelle);
2. non schiacciare i brufoli con le dita! In questo modo si aumenta la probabilità di formazione di cicatrici e la diffusione batteri nella zona intorno al brufolo creandone molti altri intorno (un effetto a catena).Questo non significa ovviamente che non sia necessario aprirli ed andare in giro con pizze giganti in faccia, è semplicemente necessario utilizzare un metodo migliore!
3. Come aprire un brufolo: in primo luogo, lavarsi le mani con acqua e sapone, prendere un batuffolo di cotone idrofilo imbevuto di acqua ossigenata (non alcol, l'acqua ossigenata è il miglior disinfettante che esista); prendere un ago sterile o un ago da cucito (in questo caso, passarlo sopra una fiamma fino a quando la punta non diventa infuocata (arancione), quindi l'ago è sterilizzato ; ora è il momento di aprire l'odioso brufolo!Inserire l'ago nella piccola bolla di pus che si è formata con delicatezza senza andare a fondo, ma a partire da un lato, attraversare completamente e poi tirare l'ago verso l'alto; in questo modo si rompe la "pellicina" che racchiude il pus senza creare traumi alla pelle e si può pulire il brufolo con cotone imbevuto di acqua ossigenata premendo leggermente se necessario.
4. Giù le mani dalla faccia! Pulire spesso ciò che viene a contatto con la nostra faccia (telefoni, cuscini ecc) e non toccare il  viso se non ce n'è bisogno!! mettere le mani  sul volto, soprattutto quando sei fuorida casa, non fa altro che far  proliferare batteri sulla nostra pelle!
5. Dare una chance! Quando si tenta un nuovo prodotto di cura della pelle bisogna  essere perseveranti nel suo utilizzo! Dopo una settimana non si può pretendere un miracolo! Per vedere dei risultati si dovrebbe attendere almeno un mese!
Questi sono i consigli che ho trovato personalmente efficaci, ma naturalmente è anche necessario utilizzare prodotti specifici per i problemi della pelle.

Questi sono i prodotti della mia cura quotidiana della pelle; Penso che possa  essere utile per tutti  provarli perché per ogni prodotto la formulazione è stata creata creati per i diversi tipi di pelle da secca a grassa  e sono efficaci per affrontare i  vari problemi di pelle: pulizia profonda, lotta  all'acne e punti neri,idratazione della pelle .

- CLINIQUE liquid facial soap milk (from very dry to oily skin)

-CLINIQUE Mild Clarifying lotion ( gently exfoliator from dry to oily skin)

-Avène EAU THERMALE ( soothing thermal  wather for acne and persistent redness)


- BIONIKE  Defence Hydra ( deep hydratation from dry to oily skin)

-KANEBO Sensai Eye Contour Cream (eye contour hydratation)

-KANEBO Silky Purifying Cleanising Oil ( from dry to oily skin deep cleanising, makeup remover)

Spero che questo post vi piaccia  e se volete sapere qualcosa su un prodotto specifico dovete solo postare un commento.


sabato 15 dicembre 2012

Christmas Gift Ideas HR Eyes Kit


You want to give or enjoy a makeup product for this Christmas but  you are undecided on what to buy ... What do you think of a set that contains multiple products? If the focus of your makeup is in the eyes you might like this! Helena Rubinstein KIT comes in a hard cardboard box adorned with Golden decorations like snowflakes, just suitable for the Christmas time and I find that it is also convenient because it costs only a few euros more than the single mascara.
The set includes three products: the LASH QUEEN MASCARA SEXY BLACKS in full size, mini size (not  so mini, 50 ml are not so few) of eye makeup remover biphasic ALL ABOUT EYES for all types of mascara and finally a super mini size of anti-aging eye balm PRODIGY EYES. I'll do a more in-depth review of individual products, but I already tried the rimmel and I must say that is not bad at all  and I think it would be helpful  the before and after picture to appreciate better the effect on eyelashes.
Happy HOLIDAY SHOPPING!


Volete regalare o regalarvi un prodotto makeup per questo Natale ma siete indecise su cosa comprare... che ne pensate di un set che contiene più prodotti? Se il punto focale del vostro trucco sono gli occhi questo kit potrebbe piacervi. Il KIT di Helena Rubinstein si presenta in una scatola in cartoncino rigido dorato adornato da decorazioni simili a fiocchi di neve, proprio adatto al periodo natalizio . Non meno importante, trovo che sia anche conveniente perchè costa pochi euro in più del singolo mascara. 
 Il set  comprende tre prodotti : il LASH QUEEN MASCARA SEXY BLACKS in full size, una mini taglia (non troppo mini, 50 ml non sono così pochi)  di struccante occhi bifasico ALL ABOUT EYES per tutti i tipi di mascara ed infine una super mini taglia di balsamo occhi anti età PRODIGY EYES. Farò una review più approfondita dei singoli prodotti, ma ho già provato il rimmel e devo dire che non è niente male e penso che sarebbero utili delle foto del prima  e dopo per far apprezzare al  meglio l'effetto sulle ciglia.
Buono SHOPPING NATALIZIO!


mercoledì 12 dicembre 2012

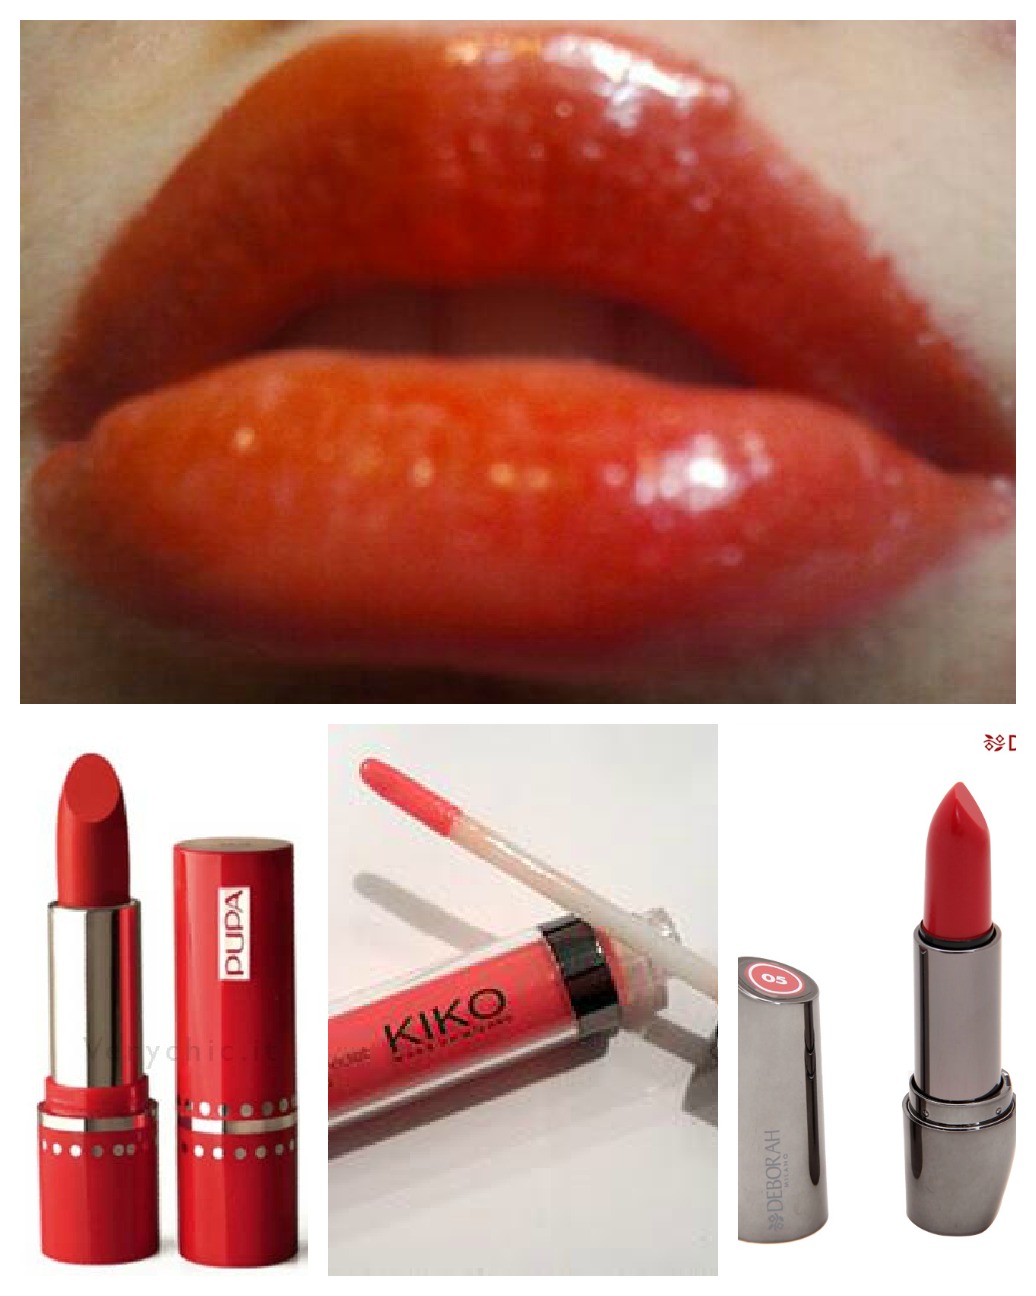
Red Lips for Christmas

Adoro il rosso, il colore del Natale e ancora di più i rossetti rossi. Colore difficile da portare sulle labbra perchè può essere bellissimo o risultare un pugno nell'occhio. Sono sempre alla ricerca del rosso perfetto, o meglio, il rosso perfetto per me , considerando le innumerevoli sfumature, toni caldi o freddi etc...Se si vuole indossare un rosso acceso anche i denti devono essere perfettamente bianchi come quelli delle star  e per averli splendenti non c'è dentrificio o striscette magiche che tengano,  è necessario ricorrere a costosi trattamenti dal dentista. Per questo ho  deciso di creare un  look natalizio molto portabile mixando i toni dell'arancio e del rosso strizzando l'occhio a chi per vari motivi non ha dei denti da star : i toni aranciati non mettono in risalto identi quanto il rosso acceso o un fuxia. Ok, ho parlato troppo quindi passiamo ai prodotti usati
1.Ho fatto un leggero scrub per le labbra per renderle più morbide
2. Ho applicato del burro cacao, l'ho lasciato agire ed ho tolto l'eccesso con una velina di carta (divite gli strati di un fazzolettino di carta e il gioco è fatto )
3. Ho applicato del fondotinta liquido per annullare il colore delle  labbra
4. Ho applicato un velo di cipria- MUFE  Hd Powder
5. COLORE! Il primo rossetto usato è Pupa Easy Rouge  11, un rosso a media coprenza e leggermente shimmer applicato con un pennello
6. Il secondo rossetto  è Atomic Red 04 Deborah, alta coprenza e finish leggermente glossy
7 Ho definito il contorno labbra con un correttore a penna - UD 24/7 concealer
8. A questo punto il trucco può definirsi completo, ma se amiamo l'effetto plumpy lips possiamo accentuarlo con un gloss neutro . Io ho usato un velo di  gloss olografico, adatto alle feste, Kiko Night Lights Lip Gloss 02.
Grazie per aver letto il mio post e se ne avete voglia ditemi qual è il vostro rossetto rosso perfetto!
I love  red, the color of Christmas and even more the Red lipsticks! Hard color to wear on the face because it can be amazing or be an eyesore. I'm always looking for the perfect red, or rather, the perfect red for me, considering the countless  tones, hot or cold tones etc... If you want to wear a bright red even teeth must be completely white as those stars and shining them there's no toothpaste or magical strips which take, it is necessary to resort to expensive dental treatments. That's why I decided to create a Christmas look very portable mixing shades of Orange and Red winking at who has no super white  teeth like a star : Orange tones do not emphasize teeth like bright red or Fuchsia.
 Ok, I talk too much so let's go! These are the products I've used !
1. I made a slight lip scrub to make my lips softer
2. I applied a lip balm,  left  it a little bit  and I removed the excess
3. I applied  liquid Foundation to cover  the lip color

4. I applied a thin layer of face powder-MUFE Hd Powder

5. color! The first lipstick used is Pupa Easy Rouge 11, medium coverage and  slightly shimmer , applied with a lip brush


6. the second  lipstick is Atomic Red 04 Deborah, high opacity and a slightly glossy finish

7 I've defined the outline lips with a concealer -UD 24/7 concealer
8. at this point, the makeup can be considered complete, but if we love the plumpy lips effect we can emphasise it with a neutral lip gloss. I used a thin layer of holographic gloss, suitable for holidays , Kiko Night Lights Lip Gloss 02.

Thank you for reading my post and if you want,tell me what's your perfect red lipstick!

venerdì 9 novembre 2012

Italian style Carpisa A/I 2012collection


Adoro i gadget sui cartoons! Mi ricordano l’infanzia, i pomeriggi tranquilli passati a guardare la tv .Qualche giorno fa ho notato in una vetrina un trolley di Tweety ed è stato amore a prima vista. Fa parte della collezione autunno inverno di quest’anno della Carpisa, che ha creato una collezione di borse , trolley e portafogli   ispirate ai personaggi Warner. Titti, Silvestro, Bugs Bunny e Super Man. Il mio preferito è in assoluto il trolley di Titty , ma mi sono piaciuti molto anche  i portafogli, abbastanza grandi e comodi .Le borse, in vari formati, partono dai 30 euro e comprendono modelli in vernice, tessuto a spina di pesce e tessuto tartan ( il famoso scozzese che andrà di moda questo inverno). I trolley sono in tre formati (s,m,l) e partono dai 60 euro .

 Per seguire Carpisa e tutte le sue  novità e promozioni   http://www.carpisa.it/en


I love cartoons gadgets ! They Remind me of childhood and  quiet afternoons spent watching tv.A few days ago I noticed in a showcase a trolley of Tweety and it was love at first sight. It’s Part of the Carpisa  autumn winter collection of this year .The brand  Carpisa  has created a collection of bags, trolley and wallets inspired by  Warner characters like Tweety, Sylvester, Bugs Bunny and Super man. My favorite is the trolley of Titty, but I also really liked the wallets, quite large and comfortable.The bags, in a variety of sizes, starting from 30 euros and include patent leather, herringbone fabric and fabric tartan bags  (tartan fabric  will be will in fashion this winter). The trolleys are in three sizes (s, m, l) and the price start from 60 euros.To follow Carpisa and its news and promotions visit their website http://www.carpisa.it/en


giovedì 8 novembre 2012

Ciaté Mini Mani Advent Calendar: a Christmas post for polish addicted

I've always loved collecting boxes and decorated containers of any material :tin boxes  of cookies, vintage boxes,  cardboard boxes where to store small things like that otherwise would be  lost. And when   gifts comes in a beautiful box is even better! Talking  about packaging and gifts, for this Christmas Ciaté  has created a very unique Advent calendar, the Ciatè Mini Mani Advent Calendar. This is not a simple cardboard calendar with windows like those we had during the  childhood, because this time behind every window there’s ... a nail polish! A nail polish for each day until December 24. I think it's a really cute idea that lets you try many different colours, the caviar manicure for those who still had not proven it and maybe do an absolutely original gift to a friend. The box is large enough and decoration style remind me  of Missoni fashion style . Inside, 20 5ml Nail Polish, a little funnel and 4 mini bead containers for caviar manicure with a sheet of instructions. Three glitter effect polishes have been created exclusively for this kit.
The kit Ciaté Mini Mani Advent Calendar is available on the official website  http://www.ciate.co.uk/, on  http://www.selfridges.com/ and Sephora http://www.sephora.com/


Ho sempre amato collezionare scatole e contenitori decorati di qualsiasi materiale, da quelle di latta dei biscotti, a quelle vintage, alle  scatoline di cartone dove conservare  le piccole cose come gli elastici per capelli o il plettro della chitarra che altrimenti andrebbero irrimediabilmente persi. E quando si tratta di regali, se sono contenuti in una bella scatola è anche meglio! A proposito di packaging e di regali, ho scoperto per questo Natale il brand Ciatè ha creato un calendario dell’avvento molto particolare: Ciatè Mini Mani Advent Calendar. Non si tratta di un semplice calendario  di cartone con le finestrelle come quelli che avevamo da bambini perché stavolta dietro ad ogni finestrelle c’è … UNO SMALTO! Uno smalto diverso per ogni giorno fino al 24dicembre. Penso che sia un' idea veramente  carina che permette di provare tanti smalti di colori diversi, la caviar manicure per chi ancora non l’avesse provata e magari fare un regalo assolutamente originale ad un’ amica. La scatola è abbastanza grande e lo stile della decorazione ricorda un po’ quello di Missoni. All’interno, 20 mini smalti da 5 ml, un piccolo imbuto e 4 mini contenitori di perline per l’effetto caviar manicure con un foglio delle istruzioni per realizzarla. In  tre smalti effetto glitter sono stati  creati esclusivamente per questo kit. 
Il kit Ciaté Mini Mani Advent Calendar è disponibile sul sito ufficiale della Ciaté http://www.ciate.co.uk/ , su http://www.selfridges.com/ e speriamo  presto anche in Italia dove il brand è venduto da Sephora ( in teoria, perché io per ora ho visto solo uno stand vuoto).


domenica 4 novembre 2012

Holiday gifts...


Christmas has no middle way: you hate it or you love it! of course I  belong to the second category and although there’s about one month left at the arrival of the Christmas holidays I am already looking for ideas, stuck to the storefronts starting to trick up  with Christmas decorations and snowflakes. In short, if I were to explain my relationship with Christmas,I can say that I’m crazy for Christmas like competitors of the tv show Extreme Couponing are crazy for coupons!!! For me it's never too early to start thinking about everything that is related to the holidays: home decor, gifts, Christmas Eve menu etc. ... For this I thought to start my blog with a post about  a new makeup collection dedicated to Christmas. This is the Paul & Joe  Winter Wonderland  Eye colour and Lipbalm set that with his   captivating packaging brings us immediately to  the Christmas atmosphere. The set consists of three beautiful Tin boxes decorated  with pictures of squirrels and fawns surrounded by a snowy landscape (awww I love chubby animals *O*).
The set includes:
-a single brown eye shadow with a slightly Pearly finish for asmokey effect

-a glistening eye duo comprising a highlighting powder and a bronze shade
-a moisturizing pink lip balm with jojoba, apricot seed oil and olive oil.

A great gift idea and a perfect look for the holidays, combined with a gold coloured polish, maybe an OPI polish (heh, heh I love Opi, I will talk about it in another post ...) and a line of deep black ! And divide the set of three friends? An idea even cheaper! I would choose the eyeshadow duo!the set is available in limited edition on www.asos.com
You have cute ideas for your Christmas gifts? Then write me! I want to share our ideas! 
Il Natale non ha vie di mezzo: o si odia o si ama! Io naturalmente appartengo alla seconda categoria e anche se manca più di un mese all’arrivo delle feste natalizie sono già in cerca di idee, appiccicata alle vetrine che cominciano a riempirsi di decorazioni e fiocchi di neve. Insomma, se dovessi spiegarvi il mio rapporto col Natale,citando il mitico programma TUTTI PAZZI PER LA SPESA,mi verrebbe in mente un titolo: “Tutti pazzi per il Natale”! Per me non è mai troppo presto per iniziare a pensare a tutto ciò che è legato alle feste: decorazioni per la casa, regali, menù per la vigilia etc….Proprio per questo ho pensato di inaugurare il blog con una nuova collezione makeup dedicata proprio al Natale. Si tratta del Paul & Joe Winter Wonderland Eye colour and Lipbalm set che con il suo packaging accattivante ci riporta subito alla mente l’atmosfera natalizia. Il set è composto da tre bellissimi contenitori in latta decorati con immagini di scoiattoli e cerbiatti circondati da un paesaggio innevato .
Il set comprende :
-un ombretto mono marroncino dal finish leggermente perlato per uneffetto smokey-un duo composto da un colore chiaro illuminante e un bronzo
-un lip balm rosa idratante con olio di albicocca, jojoba e olio d’oliva
Una bella idea regalo e un look perfetto per le feste, unito a uno smalto color oro,magari della OPI (eh,eh di questo ne parliamo in un altro post...) e una linea di eyeliner! E dividere il set fra tre amiche? Un' idea più economica! Io sceglierei subito il duo! ll set è disponibile in limited edition su www.asos.com